Common realistic spaces include small and large rooms, chambers, halls as well as churches and cathedrals.
Creating these spaces is easy using the LX480 because the original hardware was designed to remove complexity when setting parameters.
Here are 8 simple steps to create realistic spaces.
Although the steps are similar for each type of realistic space, each has its own specific qualities and characteristics.
We’ll cover each specific reverb type in more detail later.
The Dual-Engine allows you to chain two different effects together in new and exciting ways, creating unique senses of spaciousness and envelopment.
Envelopment (spaciousness, wideness, 3D etc) is the feeling that reverberation surrounds you from all sides, in a stereo speaker configuration a reverberation that has 360-degree envelopment is technically problematic but you can create imaging that has a similar sense of spaciousness from the front. The ideal goal is that when you close your eyes and try to visualize the room/hall and you feel like standing in a real space.
To find the current engine configuration, simply press the Setup Button, and then click on the Config Tab.
You can switch between each engine’s settings by using the E1 and E2 buttons.
By default, the LX480 is set to a single configuration. This means audio will only be routed through the currently selected engine. In this instance, only one engine will be active.
When creating realistic spaces you will almost always want to be in the single routing configuration, this option is the default configuration in LX480. An exception to this might be using cascade mode to have the Random Ambience to feed into one of the other reverberation algorithms.
The majority of the reverb algorithms in the LX480 are designed to sit behind the dry sound source and add a smooth reverberation tail to the sound, the Plate/Room, Hall, Random Hall and Random Hall HD are all examples of this. However, the Random Ambience algorithm (or just Ambience for short) is designed to replicate prominent early reflections that gel with and color the dry sound giving the source an extra sense of depth and width.
If you are trying to replicate the reverberation tail in a small environment the room/plate is often the best option. This algorithm is optimized to create a quick build-up of echo density that is present in small spaces and mechanical devices.
For medium-sized spaces, try using the Hall algorithm. This has a slower build-up of echo density, but once it has reached its peak density it is much more diffuse than the plate/room.
For the largest spaces, use Random Hall or Random Hall HD. The Random Hall also has a slower build-up of echo density but also uses a unique randomization system to reduce metallic coloration in the reverb tail, this coloration is most easily discerned when the reverb tail is long. Random Hall HD expands on the technology in Random Hall by removing some of the restrictions imposed by the technology restraints of the original hardware and is the cleanest and smoothest of all the algorithms.
The Random Ambience is best used when you want to add early reflections to a source which was recorded in an isolation booth. Most sound sources recorded in live spaces have some natural early reflection information captured at the source, due to its randomness, the Ambience algorithm can also be used to add additional early reflections to a poorly recorded source, but use this with care as it can cause a source to lose definition when used excessively.
This parameter has two functions. To link or delink parameters, as well as changing the way the algorithm responds to different input levels both of these characteristics affects how realistic the reverberation sounds.
The DCO parameter has 20 steps. The lower half (0-9 RVB) is called reverb mode. The upper half (0-9 EFX) is called effects mode.
When DCO is in reverb mode, the spread control affects how large the space sounds. This makes it easier to create realistic spaces.
When you're in effects mode, size and shape are not linked together. This means that you can use high spread values with small sizes to create unique, but strange-sounding soundscapes.
DCO is usually best set to 7 RVB when creating natural spaces.
The numeric part of the DCO parameter dictates how the reverb decays based on the input level. For values closer to zero, the decay is more even and less dependent on the input level. Values closer to 9 decay more randomly at high input levels.
This means that for lower values, sounds will be more consistent at different volumes, but for higher values, sounds will be more unpredictable and lively at different volumes.
Once you have confirmed that the DCO is set to a reverb mode, you can then set the size parameter.
The size parameter roughly correlates to the size of space in meters. Increasing the size value makes the RTM and SPREAD ranges bigger.
Once you have the right size, tweak the reverb time to get the length of reverb you need.
Note
Remember that the time listed is for the mid frequencies. We’ll adjust the reverb time for other frequencies later.
The diffusion parameter controls the echo density of the reverb.
Larger spaces tend to build up slowly but once it has bloomed they become very dense with reflections. Smaller spaces bloom more quickly but are less dense. You can think of the diffusion parameter as a fine control of echo density, and should be adjusted once the algorithm and size values are already established.
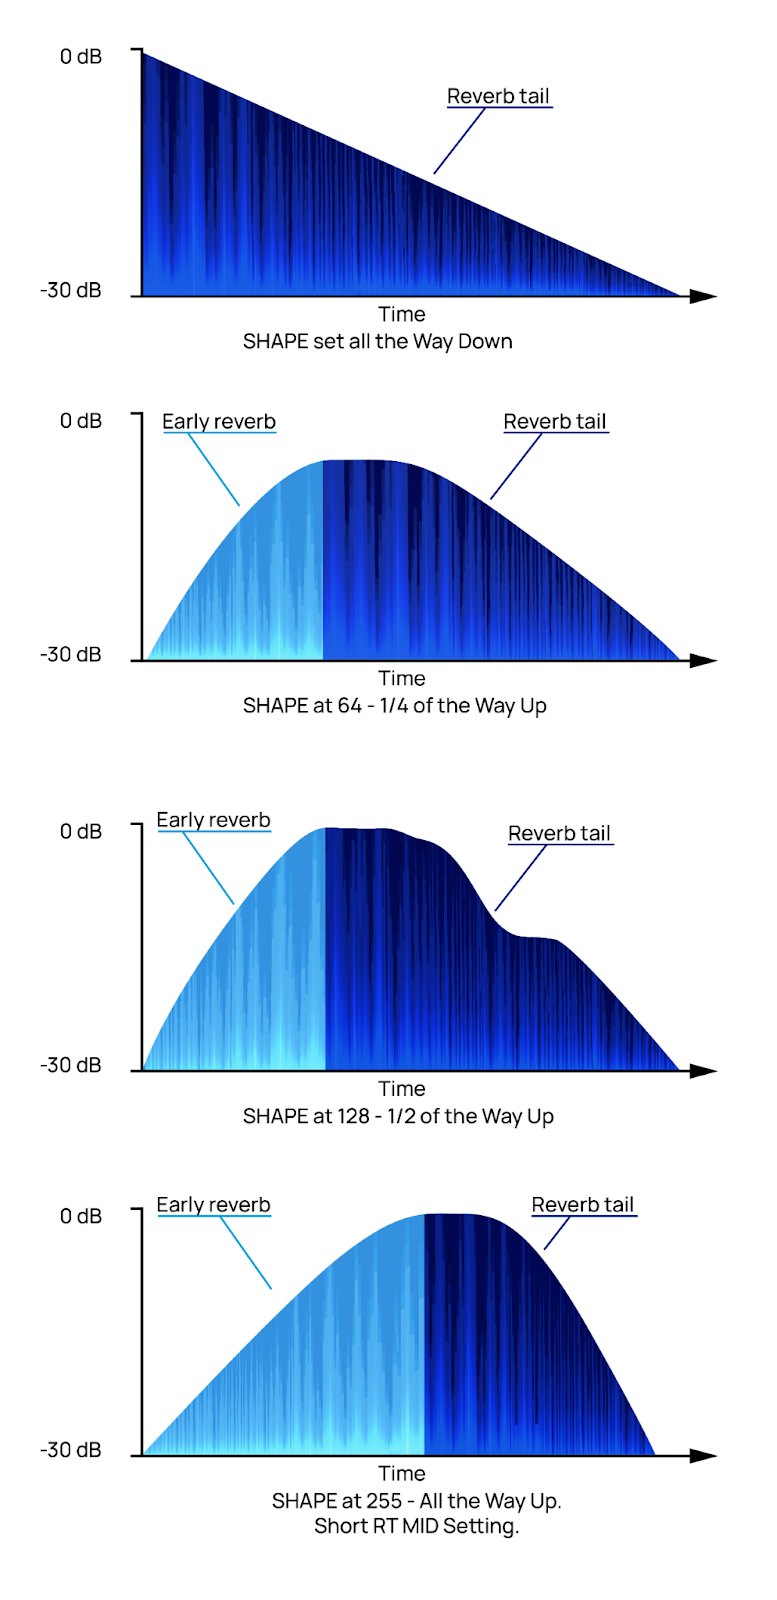
Now it is time to adjust how quickly the reverb builds up and decays as well as the perceived sense of “envelopment” of the reverb.
This is done with both the shape and spread parameters. You can think of Shape and Spread as controlling the “acoustic signature” of the space. You will likely want to fine-tune the shape and spread parameters one after the other.
Start with spread to control the spacing and density of the reflections during the initial build-up, higher values makes the apparent space bigger.
Then adjust the shape to control how long it takes for the reverb to reach its peak amplitude and how long it takes for the sound to decay.
Larger rooms typically take longer time to reach their peak amplitude, so you can add more shape if needed.
The shape and spread settings are key if you want your reverb to sound more realistic. For small spaces, add a little of both. For large spaces, add more. But be careful not to make the reverb too disconnected from the dry sound.
Now that the overall spaciousness is crafted, you can refine it further by adjusting the other settings.
The most common adjustments are to the bass and high-frequency reverb time multipliers and crossover frequencies.
In real spaces, it is common for bass frequencies to decay over a longer period and high frequencies to decay faster.
For a digital reverb to create realism, it must have the ability to accurately reverberate low frequencies. In some cases it's obviously not desirable to have a lot of low freq content and it can of course be dialed back, but for realism you'll need to have low freq reverberation.
In many plug-ins there's an uneven distribution of frequencies - some frequencies are even missing in the reverb.
The type of material in a room can affect how quickly high and low-frequency sounds disappear. Rooms with materials like brick, metal, and tiles usually have high-frequency information that lasts longer.
Most rooms or halls work well with a bass multiplier between 1.0x and 1.2x and a high-frequency multiplier around 0.2x to 0.4x.