More articles within same category:
Learning Center CPT » Primary Display
The Primary Display section is where you will find the controls to change the LX480's algorithm, as well as the Input and Output level meters.
The look and function of the Primary Display will change depending on which of the two operation modes is selected.

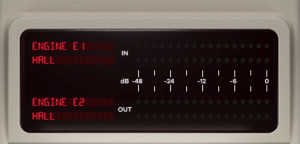
In Hardware Mode (HDW), the primary display was purposefully designed to closely resemble the original hardware.
The primary display in Hardware Mode (HDW) consists of only two important items:
Hardware Mode (HDW) only includes parameters found on the original device and matches the parameter order. For exclusive plug-in only features, use Advanced Mode
The algorithm can be quickly and easily be changed by clicking on the algorithm's name for the specific engine you wish to modify.
The audio meters show the signal level on the dBFS scale.
The input signal is the dry signal after trimming. The output signal is the summed output, which includes the dry and wet signals, after trimming.

In Advanced Mode (ADV), the primary display allows you to visually edit some of the most frequently used parameters, quickly and easily.
While using Advanced Mode, the primary display expands to reveal several tabs and controls.
Many of these controls can be modified by clicking and dragging with your mouse.
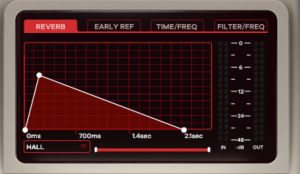
Advanced Mode (ADV) displays visual feedback of the settings for the currently selected engine.
To adjust the different parameters, you can either use the conventional sliders, or click and drag the various nodes found on the graphs in the primary display. These graphs are separated into four tabs found across the top of the primary display:
You can select the current engine's algorithm using a dropdown menu located in the bottom left corner of the primary display.
The available algorithms are:
For a more comprehensive explanation of the differences between each reverb algorithm, feel free to explore the following section: The Algorithms Of The Relab LX480 Dual-Engine Reverb Plug-in.
The Reverb Tab offers a broad representation of how the reverb behaves over time.
There are three draggable circular handles on the contour, each responsible for a specific parameter value:
The Early Ref tab allows you to set the volume, pan and timing of up to six early reflection delay taps.
The odd-numbered taps appear as white circles with red text, while the even-numbered taps appear as red circles with white text.
While many reverbs use single, discrete echoes, each early reflection delay tap in the LX480 is a diffuse and complex cluster of echoes. This creates a more authentic feeling of an acoustic space.
You can change the amount of diffusion using the DIF control found under the DEN function key.
The Ambience algorithm has no adjustable early reflections. Any adjustments made here will have NO effect on the sound.
The Twin Delay algorithm functions differently from the reverb algorithms. There are only FOUR early reflection delay taps, and no diffusion (DIF) control.
Each early reflection delay tap (Early Ref) can be dragged left or right, and up or down, to change the delay time or signal level.
And like the Reverb Tab, the Early Ref time axis can be rescaled by using the scroll bar below the graph.
The vertical distance from the center line represents the level of the tap.
When the ERTM or ERVL function page is open, any changes made are reflected on the sliders.
If a preset has no early reflection taps set, all markers will be set at the graph's origin (time and level 0).
As you add early reflection delay taps, each marker will appear in order. Marker 1 is the first to be placed on top, followed by Marker 2 on the bottom, and so on and so forth.
If a preset has only a few early reflection delay taps, you can add more simply by grabbing the top marker at the origin and dragging it wherever you want it.
To remove an early reflection delay tap, simply return it to 0 on the center line.
There are three taps for each input channel: 1 to 3 for the Left (L) input channel, and 4 to 6 for Right (R) input channel. Two of which (Delay 2 for L, and Delay 5 for R) are cross–panned and mixed with the taps from the opposite side.
Markers 1, 3 and 5 are constrained to positions above the central line, to let you know that they are outputted on the left input channel. The remaining markers, 2, 4 and 6, are constrained to positions below the central line, and are therefore outputted on the right input channel. The differences in a delay tap's input and output channel configuration allow you to create a wider stereo width in the reverb.
The table below shows each early reflection delay tap's input and output channel routing.
| Delay Tap Number | Input Channel | Output Channel |
| 1 | L | L |
| 2 | L | R |
| 3 | L | L |
| 4 | R | R |
| 5 | R | L |
| 6 | R | R |
Clicking the Time/Freq Tab displays a three-block, intuitively-designed graphical representation of the adjustments made to reverb time.
The center block represents the Reverb Time Mid (RTM) parameter, and its level is locked.
The blocks on either side of the RTM center block represent the low and high frequency range multipliers. The reverb time and the crossover frequencies of these outer blocks can be freely and easily adjusted.
Both the low and high-frequency blocks display their reverb time as a multiple of the RTM. For instance, if the RTM is set to 2.0 seconds, and the low multiplier is x0.5, then the reverb time for the low frequencies would be 1.0 seconds.
The left–hand block, which represents the lower frequencies, can be dragged above the central line (for multiples up to x4.0) or below the central line (for multiples down to x0.2).
The right–hand block represents the higher frequencies and covers a range from the central line (x1.0) down to x0.2.
Each multiplier range makes it faster and easier to craft realistic spaces. In a typical acoustic space, lower frequencies tend to “ring” longer and higher frequencies usually “ring” shorter, because they are more easily absorbed by the environment.
You can set both the lower and higher bands by dragging the circular nodes.
The center band cannot be adjusted on the actual graph. It can only be adjusted using the Reverb Time Mid (RTM) parameter. With no adjustment, the center block will stay locked to a multiplier of x1.0.
Horizontally dragging a node changes its crossover frequency:
Vertically dragging a node adjusts the multiplier of that band:
The multiplier displays a multiple of the reverb time for the mid frequencies (RTM)
In the Twin Delays algorithm, these controls have zero effect.
In the Ambience algorithm, only the High Frequency controls have an effect.
If the nodes are dragged so that they are overlapping the central block, the reverb times for the overlapped frequencies in the central block are multiplied by the product of the BAS and HIG parameters.
To learn more about how each parameter works, please read the How To Shape The Sounds Of The Relab LX480 Dual-Engine Plug-in section.
The Filter/Freq Tab is a graphical representation of the high-shelf and low-shelf filters you can apply to the processed signal (both reverb and early reflections).
Dragging the two nodes will affect each filter:
More articles within same category
Use our plug-ins for 30 days risk-free from the day of purchase and if you're not loving it, then we don't want your money. Get a full, friendly and fast refund. No questions asked!
Our learning center is packed with technical information, fast and easy"how to" guide, tutorials and more! And If that doesn't help, you can always reach out for a fast answer from our support team!
Get the latest Relab news, product info, and great deals and personal service.
Don't worry, we're not going to send you spam. Only the most necessary and important news awaits you.
